Wednesday, November 28, 2012

Hi everyone, I was going to say christmas is creeping up on us, but more accurately it's racing towards us at a cracking pace! I hope everyone is getting their christmas shopping done early to avoid the crowds, most of my christmas shopping this year has been/will be done online in my effort to try to support small business & handmade. It also means I can avoid the shops as much as possible (because as anyone who knows me well will tell you, I hate shopping with a passion!).


Last time we spoke I mentioned that I would tell you about the different type of glass I use in lampworking. I use mainly soft glass (also known as soda lime glass) & it can have inclusions in it like silver & gold which gives you a different effect when you melt & then work it. It is also called 104 glass which, without going into great detail, means that it's Co-efficient Of Expansion (the amount the glass expands & contracts when it's heated) is 104. This is very important as, in general, glasses with different COEs don't play well together & if mixed will often develop incompatibility cracks throughout the bead. That is a very simplified explanation of what is a very involved & complicated subject but it's probably enough for you to understand the general gist.


Soft glass comes in 2 main types - opaque & transparent. Opaque glass is in general softer than transparent glass & includes colours like white, ivory as well as opaque shades of all of the colours of the rainbow. There are some colours that are not very well represented in the 104 colour spectrum, a hot/intense pink is one hue that can be difficult to find as is an intense lavender/purple (for those Aussie's amongst us, the colour of jacaranda flowers).


Transparent colours are in general much stiffer than the opaques & can be harder to work, depending on what you are doing with them. One application where transparents are superior to opaques is sculptural pieces, the extra stiffness that the transparent glass gives means that you can keep the piece warm more easily without melting all of the features into a blob like you are more likely to if you use a soft opaque like white or ivory. One surprising fact is that the most common forms of black glass is actually a very dense transparent dark purple & if applied thinly it dilutes back to it's base colour (reddish purple). To combat this glass manufaturers have made a couple of "true" blacks, the most well known of which is Intense Black.


But apart from those few small chinks in the colour pallete, soft glass has an amazing range of colours & is one of the most popular lampworking glasses in use today.


Next time, we will discuss the silver glasses & their use.


Sunday, November 11, 2012

Hi everyone, I hope you are all enjoying my posts on how I make my lampwork beads. This last week our lovely children used up all our internet allowance downloading games & videos on YouTube so I was stuck with almost dialup speed connection for the whole week which is no fun, hence why I have put off doing this post until our new month's data allowance started.


Now, where were we? Ohhh that's right, our beads have been annealed & have cooled overnight in the kiln & the next morning we can take them out. So, here they are, still on their mandrels after they have been annealed.


The next step is to pop them in a bucket of water & let them soak for a few minutes before gently holding the mandrel in one hand (or in my case pliers!) & twisting the beads off. The water softens the bead release (remember, that's the white stuff on the mandrel that stops the glass fusing to the metal permanently) & lets you remove the bead easily, it also stops any bead release dust flying around as it's not very good for your lungs to inhale it.


After they have been taken off the mandrel the next step is to soak them in a small tub of water for a few minutes more before cleaning the bead release out of the bead holes. To do this you can use something like a pipe cleaner or a diamond tipped bit in something like a dremel which is what I do most of the time. Here is a pic of the beads in my bowl & the bit that I use for cleaning the holes, it's on a flexible shaft coming from the dremel which means it's easy to manoeuvre.


So we've cleaned the beadholes, now there is nothing more to be done but rinse them in some clean water, wipe them over & dry them, check them for cracks or sharp ends/holes & then photograph them so they can be listed on Etsy or FaceBook.


And here's our finished bead - you can find this one & some of the other ones from this blog post in my Etsy shop


I hope you've enjoyed this small insight into how lampwork beads are made. I do have a short video that I will post soon (when Eddie has downloaded it off the camera & I can edit it!), but in the mean time, please come & visit again as next time I will start a series of posts on the mysteries of the glass itself. :)

Tuesday, November 6, 2012

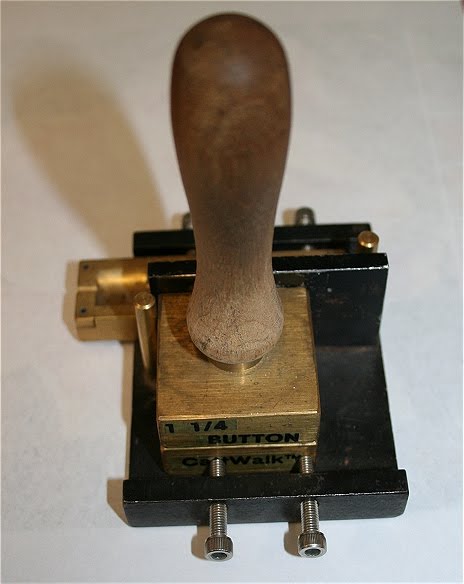
After you have pressed your bead & removed the chill marks it will be ready to pop in the kiln for annealing. Annealing is basically slowly cooling the bead to relieve internal stresses in the glass. As glass is heated, it expands & as it cools it contracts again & this causes stress in the glass & if not cooled slowly enough the glass will suffer thermal cracking. For a bead to be properly annealed, it is necessary to cool the glass in a controlled manner through a predetermined temperature gradient. We do this in a kiln, a picture of mine is below.

You can see in the pic on the right, the little flap that lifts up, that is called the bead door & is where you put the bead when you've finished making it onto a metal rack inside that keeps it off the kiln floor. The beads are kept at an even temperature after you make them (called "garaging") until you are finished your beadmaking session, then you kick off the rest of the program which slowly cools the kiln down over a number of hours. So, now our beads are cooling in the kiln overnight, pics of the beads when they come out tomorrow :) .

Sunday, November 4, 2012

Things are getting busy here, we are coming up to the end of the school year for us here in Australia & then the summer holidays & Christmas. I have been spending a lot of time torching & doing all the photography, photo editing & listing that is involved in having an Etsy shop.


Last time I posted I spoke about putting the molten glass on the mandrel & today we will talk about shaping it using presses.


The most basic ways to shape glass are by using gravity & by using the heat of the flame (with no other counteracting forces, glass flows towards the heat). You can make some shapes like this, but if you want to make lots of bead shapes, the quickest & most efficient way is to use a marver or a press. A marver is simply a flat paddle of graphite that you roll the molten glass on to create shapes like barrels & bicones. You can have handheld marvers or ones that are torch mounted - I have both & each of them is used for a different technique, the handheld one gets used for rolling a bead whereas the torch mounted one I use a lot to tidy the ends of the bead.


Presses on the other hand given an almost infinite array of shapes & what you can make with them is really only limited by your imagination (or rather, the imagination of the person making the presses). Presses are usually made from brass as molten glass won't stick to brass & it is very strong (unlike graphite which is very brittle & breaks easily - ask me how I know, go on, ask LOL).


If you want your press to make a good impression (pun intended!) the most important thing is that the sides meet up exactly in line so that the edges of your beads are sharp & crisp. This has led to the development of 2 main types of presses, the first type have prongs on 2 diagonal corners which you slip into holes on the corresponding corner of the top half of the press & that guides the top of the press into place. In this first picture of the bottom half of the press you can see the groove where the mandrel sits, the hollowed out part of the press where the molten glass is to be shaped & the prongs in the corners. Next to it is a picture of the press when it's closed so you can see how the top fits on it.


The other type of press has a base section into which you slip the bottom half of the press & the base then guides the top of the press into position as you press down on it. The bottom half of the press is held in place in the base with screws so it can't move around while you are pressing. The type of base that I own has 2 sides to it, one for larger bead presses like the lentils that I make a lot of & a second side for smaller presses which are often the ones used to make sets. Here is a pic of both sides so you can see the difference.


And lastly, here is a pic of the lentil press with the top on it so you can see how it fits nicely on top just by using a little pressure against the base.


Tomorrow we will speak about annealing & thermal cracking, see you then!

Saturday, October 27, 2012

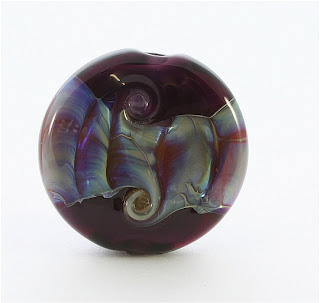
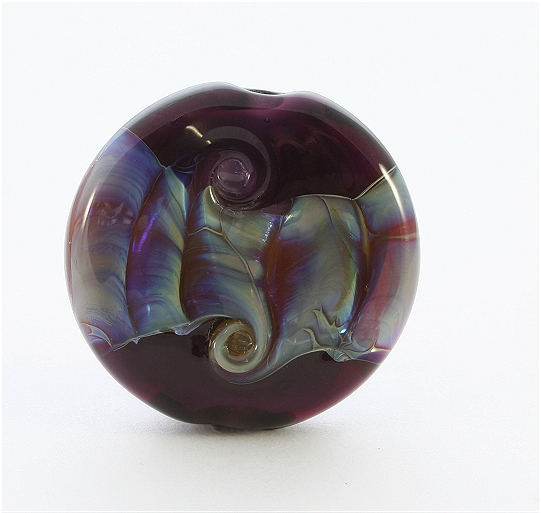
OK, so finally we have got to the stage where we're going to make a bead. Below are a some pics which hopefully demonstrate the series of steps you take. Here goes ...


Yesterday I showed you a pic but didn't explain what was happening, so we'll start there again. In this photo I have gently heated the end of the rod ready to apply it to the mendrel which I am holding in the other hand. The mandrel (with the bead release on the end) is heated in the flame until it is glowing orange (like the end of the glass rod) & then the end of the rod is touched to the heated mandrel & I start to wind the molten glass on.


This next picture shows me winding the glass around the mandrel, each time you complete a wrap around the mandrel the bead gets bigger, obviously! This pic was taken on about the third wrap, the glass on the mendrel is called the gather.


So, you continue to add glass to the mandrel until you get to the size you want. All the time you need to keep rotating the mandrel which is what shapes the bead - if you stop turning, your molten glass will end up on the table or the floor (or if you're really unlucky, your lap - which is not good! LOL).


Here I have the size gather that I want, so now I am shaping it by using heat & gravity. Glass tends to always want to round out so you can get a donut shape or a round shape fairly easily. You may have noticed that I have swapped hands, lots of people are ambidexterous & can work with the mandrel in the left hand but I'm not one of them! So I swap my mandrel to the other hand as soon as I have wound on enough glass. I'm still rotating the mandrel around & around.


And lastly, I am going to press the gather to make a button bead. The top of the press looks identical to the bottom part, except that it has a handle, unfortuunately it's not easy to get a pic of the glass when there is a brass press on top of it, this was taken just before I put the top on the press.


Hope you've enjoyed today's foray into the field of molten glass, next time we'll talk about pressing & annealing the beads.

Thursday, October 25, 2012

So, here we are finally at the pointy end of the sequence (so to speak). Remember I told you yesterday that I would share with you the secret of getting a hole through the bead? Well it's not really a big secret, some of you may have already guessed & some might already know, but here we ago anyway.


These pictured above are rods of stainless steel called "mandrels" & to make a bead you simply dip the end of the mandrel into a thick sludgy stuff called bead release & then after it's dry, you melt your glass rod & wind it around & around until you get a bead. Sounds simple, huh?


The bead release is a silica based suspension (remember from yesterday's post, glass is silica too) that stops your beads from sticking to the metal, if there was no bead release you'd never get the beads off the mandrels!


So, now we are finally down to the nitty grity - we have our exhaust fan turned on to suck away all the nasties, our torch turned on, we have our mandrels which have been dipped in bead release & our rods of glass. So, ready to melt some glass? :)


Just a little sneak peek, more tomorrow :) .

Tuesday, October 23, 2012

Of course the most important thing in lampworking after the torch is probably the glass. Glass comes in the form of rods which is basically a "stick" of glass (like a pencil or a straw)about 30cm long & anywhere from a couple of millimetres up to about 15mm thick. I use what is called "soft glass" or "soda lime glass" as compared to things like pyrex which is borosilicate & very hard to melt. Soft or soda lime glass contains soda, lime & other elements as well as silica & is used for many things like windows & bottles & of course making beads.


Here is my collection of glass (although I have to admit, it has grown even further since this pic was taken), glass ranges in price from $10 to $100+ per pound depending on what sort of glass it is & whether it has inclusions like silver or gold in it. I have my glass sorted by manufacturer, my silver glass (the most expensive glass) is in the top section (round holes) of the first pic.


Tomorrow I will show you the trick of how we get the hole through the middle of the bead :) .

Monday, October 22, 2012

I started off a short series of photos on my facebook on how I make my beads & I thought that I might do the same thing here. Firstly here is a pic of my workshop area (or Mummy's Playroom as hubby & the kids like to call it :) )


Pretty cool, huh? :) My kiln is just off to the right of the pic & my oxygen concentrator is the silver thing just under the bench to the left of where my chair is. The blue thing coming through the wall with the big long silver nose is my extractor fan which sucks out the nasties that are released when you melt glass & things like silver & other metals.

Taking a closer look at the things in the studio, firstly, here is a picture of my torch, both lit & unlit. I use a small torch from GTT (Glass Torch Technologies) called a Cricket, as you can see, its a pretty pink/purple colour.


The flame of the torch runs at around 5000°F (or around 2760°C) give or take a few hundred degrees either way, so it's pretty hot! Keep an eye out tomorrow for the next lot of pictures.

Friday, October 19, 2012

Earlier this week I was very excited to be mentioned on a very well known beading blog called Art Bead Scene. They featured a collection of beads from various Australian lampworkers & one of my beads was amongst them. Art Bead Scene is a collaborative blog effort between a number of very talented artists & has a huge following in the art bead & blogging world.

If you haven't checked out Art Bead Scene yet their blog is full of colour, creativity giveaways & challenges, you can go & check it out at

http://artbeadscene.blogspot.com.au/2012/10/beads-of-oz.html


Thursday, October 18, 2012

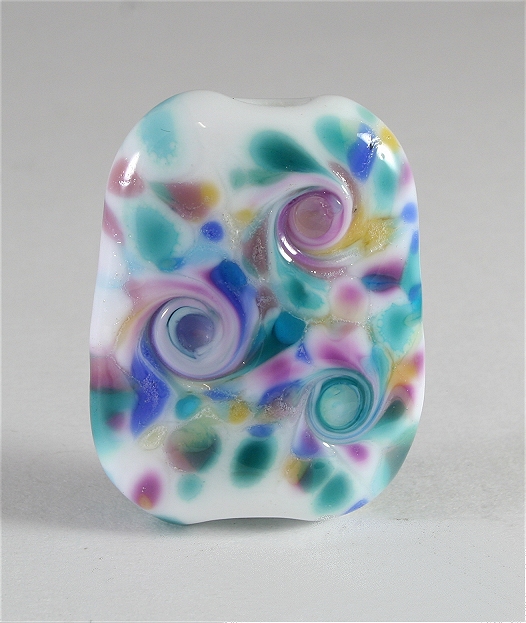
So here are a couple of sets I have done recently, one thing that I find very strange is creating with the US market in mind (on Etsy mainly). Of course being in the opposite hemisphere they are heading into Autumn & Winter whereas we are in Spring, heading to Summer, so some of my beads reflect the colours of their seasons as well as our own.


You probably noticed the 2 sets of Autumn (Fall) leaves in my last 2 posts, these sets are more standard shapes but have a similar Autumn feel to the colours.


Monday, October 15, 2012

Well, it's only 10 weeks tomorrow until Christmas finally hits us, this year has definitely flown by. I have been trying to make more sets of beads lately, I have a few sets yet to photograph so look out for those pics tomorrow. Until then, here are a few more things I have been working on.


Saturday, October 13, 2012

Well, I am certainly consistently bad at keeping this blog up to date, we're coming up to almost 3 years since I last posted, I doubt that anyone out there still knows or remembers me! But I will post this & try to remember to post more regularly (I bet you're thinking "Deja Vu?" LOL). As some of you know I have been sucked into a vortex of glass, flame & creativity that is lampworking. For those who don't know, lampworking is the art of melting glass in a (very hot) flame & shaping it into beads or other items. Here are a few of my latest creations, hopefully you'll enjoy seeing what I post & you'll come back to check out some of my future posts as well.